![]() I’m going to take a look at the process of creating a JMP add-in to create a single-file deployment package for a collection of files associated with a JMP script.
I’m going to take a look at the process of creating a JMP add-in to create a single-file deployment package for a collection of files associated with a JMP script.
Why Create An Add-In?
In recent posts I have provided step-by-step instructions for the creation of a oneway advisor and I’m going to use this script to illustrate the deployment process.
The script consists of not one but three JSL files:
- oneway advisor.jsl
- filepath definitons.jsl
- analysis components.jsl
These all reside in a Scripts folder. Futhermore there is a Resources folder that contains three image files used to display icons:
- ready.png
- pass.png
- fail.png
If I want to send the script to my colleagues I have to send multiple files, and inevitably I need to provide some instructions to ensure the files are placed in the right location.
The most convenient way to do this is to have the script attached to the JMP menu system
This means that I need to configure the menus and then send my colleagues not only a JSL file but also a menu configuration file.
What Is An Add-In File?
A JMP add-in file is simply a collection of files that have been “zipped” into a single file. The zip file contains all the files associated with the JSL application (in my example there are 6 files). In addition to these files there are two additional files that need to be included:
- An add-in definition file
- A menu definition file
The add-in definition file is a simple text file that follows a standard template. The only mandatory information required for the definition is a unique identifier. If you know that you are using new features of JMP then the definition file can also contain the minimum version of JMP required to install the add-in.
The menu file defines where the add-in will appear on the JMP menu system, what the menu structure will look like (you are not limited to a single menu item) , the names of the menu items and the actions performed when a menu selection is made.
It’s possible to create the zip file manually. If you do so, there is one final step. In order for JMP to interpret the file as an add-in file, the file extension needs to be changed from zip to jmpaddin.
But there is an easier way, the Add-In Builder.
The JMP Add-In Builder
I’m going to walk through the use of the Add-In Builder by using it to create an add-in for the oneway advisor.
The add-in builder is launched by selecting File>New>Add-In.
A tabbed-window is displayed into which I need to provide all relevant information.
On the General Info tab I will provide the name and unique identifier for my add-in. On the Menu Items tab I will identify the JSL file that is executed when a menu option is selected, and all the additional files will be identified on the Additional Files tab.
When the add-in is installed all the files will be deployed in a new location which is referred to as the “home” directory of the add-in. Usually we don’t care about the specific location, but it’s important to understand that all the files need to be accessed relative to this location.
Project Preparation
Before using the Add-In Builder I will save myself a lot of trouble by giving some thought to the organisation of my files. In particular I would like the main script (Oneway Advisor– the one that will be attached to the Add-Ins menu) to be located in the “home” folder, and for all my other files to be visible relative to this location.
Currently this is my folder structure:

If I want Oneway Advisor to be in the “home” directory then I’d like one of the following file configurations:
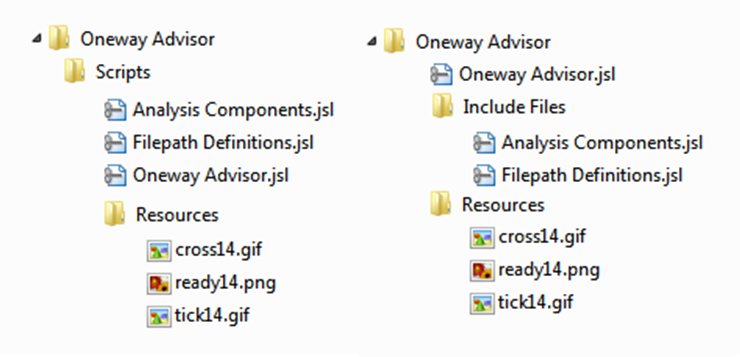
I’m going to choose to reorganise the files so that they have the structure shown on the right-hand side. My main script is at the top-level, and then I have sub-folders containing the include files and resource files.
This means changing my code to ensure that the files can still be found now that they have new relative locations. My original code assumes that my include files are in the same folder as the main script:
|
1 2 3 |
// Include files Include("Filepath Definitions.jsl"); Include("Analysis Components.jsl"); |
I can revise this to indicate that the include files have their own folder:
|
1 2 3 |
// Include files Include("Include Files\Filepath Definitions.jsl"); Include("Include Files\Analysis Components.jsl"); |
The include file Filepath Definitions identifies any other files used by the application – in this example it specifies the location of the icon files:
|
1 2 3 4 5 6 7 8 9 10 11 |
Get Icons Namespace = Function({},{Default Local}, nsICONS = New Namespace("icons.oneway-advisor"); thisDir = Get Default Directory(); resourcesDir = Substitute(thisDir,"Scripts","Resources"); nsICONS:PASS_ICON = resourcesDir || "tick14.gif"; nsICONS:FAIL_ICON = resourcesDir || "cross14.gif"; nsICONS:READY_ICON = resourcesDir || "ready14.png"; Return(nsICONS); ); |
Now that the Resources folder is within the “home” location I can make the following change:
|
1 2 3 4 5 6 7 8 9 10 |
Get Icons Namespace = Function({},{Default Local}, nsICONS = New Namespace("icons.oneway-advisor"); resourcesDir = "Resources\"; nsICONS:PASS_ICON = resourcesDir || "tick14.gif"; nsICONS:FAIL_ICON = resourcesDir || "cross14.gif"; nsICONS:READY_ICON = resourcesDir || "ready14.png"; Return(nsICONS); ); |
I’m now ready to use the JMP Add-In Builder.
General Info
I need to provide a name and unique identifier for the add-in:
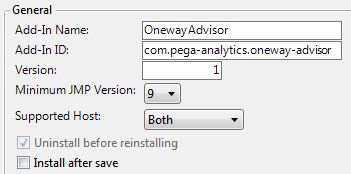
From JMP’s perspective the critical piece of information is the ID. This is the only mandatory field, and must be unique to avoid conflicts with other add-ins. Whilst you are free to choose any value for the ID, the following naming convention is recommended by JMP:
com.<company-name>.<addin-name>
The entire string can be up to 64 characters in length. It can include periods, hyphens and underscores but not spaces.
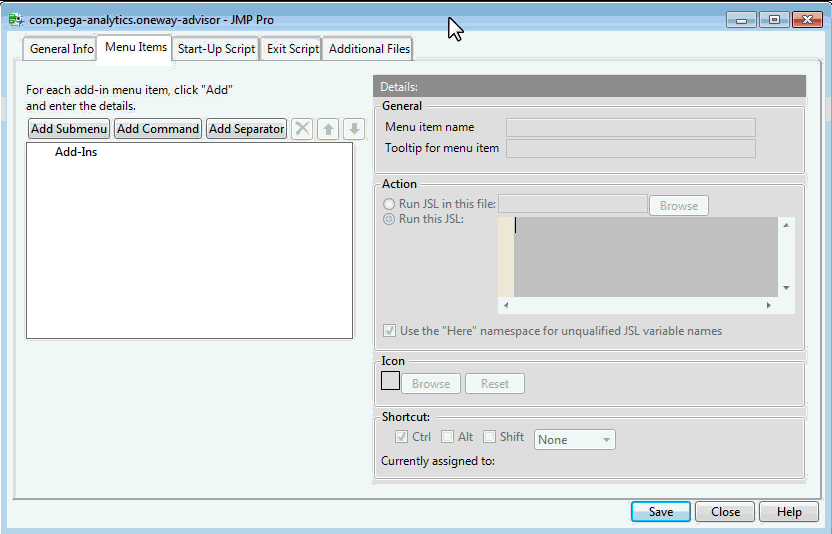
Menu Items
I only want a single menu item, “Oneway Advisor”, to appear under the JMP Add-Ins menu. Once defined I want to associate the JSL script Oneway Advisor to the menu item:
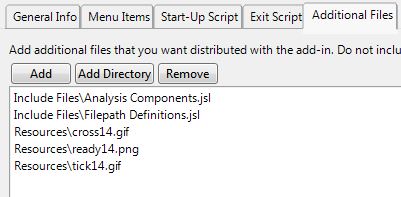
Additional Files
First I need to identify the directory containing the include files:
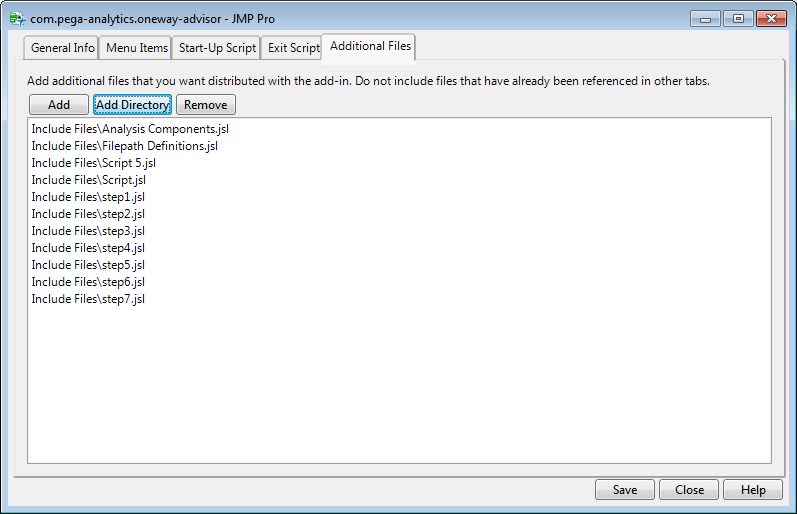
All the files in the folder are identified. I only want to include the first two files; I can get rid of the others using the Remove button. Once I’ve added the Resources directory the final list of files should look like this:
That’s It!
Those are all the steps that I need to complete the configuration of the add-in.
The add-in file is created by clicking the Save button.
Hi David,
What are the steps to install this Add-ins file created? Should we just place it in the \\AppData\Roaming\SAS\JMP\Addins path and open it from jmp?
If I place it in this path and open it it seems to give me an error saying
Thanks.
Preethi
Hi Preethi
Sorry I’ve taken rather a long break from the blog so I missed your comments. An add-in file has a file extension jmpaddin and can be saved to any location. To install the add-in open the file from JMP. JMP Software will recognise it as an add-in file and install the contents of the add-in in the correct location (\\AppData\Roaming…).
Error message is “Unable to locate Framework Directory”
I think this has been resolved now. This message is associated with the Control Panel addin. The control panel consists of project files and a framework. When the addin is created it is given a name. Often it is named after one of the control panel project files (e.g. dissolution control panel). The control panel code includes a file ‘filepath definitions.jsl’ that creates a namespace containing filepath references. These references are relative to the installation location of the addin. When the addin is given a new name, this file needs to be updated to reflect the new name. The error message you received was because there was a mismatch between the addin name and the name used within the filepath definitions.